Luling Skies Observatory
A place to collect info related to the observatory design and construction
A place to collect info related to the observatory design and construction
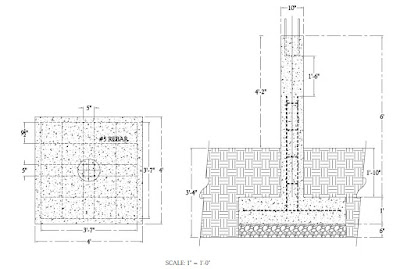
Pier design - Being 6' 2" tall I typically use the Losmandy tripod fully extended, which has the top of the tripod at 46.25” above the floor. Persons that are shorter or using Newtonian scopes may desire a shorter setup. For my setup I calculated the
Pier height above ground = 12" (floor height above ground) + 46.25 – 4.25 (pier adapter) –2.00 (plate thickness) -2.00 (mounting bolt gaps) = 50 " .
After much reading I decided on a 10" diameter concrete pier to ensure it was sufficiently strong to support my equipment. So a 10" concrete tube extending 50" above grade requires a significant footing. In my Southeast Louisiana location I don't have a frost line to worry about, but the soil is sand and clay with essentially no rock. Talking with my concrete contractor he advised a 12" thick by 48" square footer.
The structure was reinforced with # 5 rebar in the footer and the lower portion of the pier. Based on recommendations from Dr. Clay Sherrod, I left a 18" gap between the top of the rebar in the pier and the pier plate "J" bolts to minimize electrical transmission from nearby lightening strikes. To mount my Losmandy G-11 on the pier I used a Dan's Pier Plate and a Losmandy Pier adapter.
Pier Construction Pictures - With the design set construction took pace on October 10, 2015.

I mounted the pier plate to a 12 x 12" square of plywood to set the "L" bolts in the right orientation and depth. This had to be oriented properly North.
You can see the lines I drew on the board to help align the pier plate North. I was very nervous and checked, double and triple checked the orientation to ensure I got it as close to celestial North as possible.
I allowed the concrete to cure for 3 days and then we back filled the hole and stripped the cardboard tube to reveal the pier.
On October 16, 2015 I mounted the G-11 and my scope on the pier. As darkness fell I anxiously sighted Polaris through the polar scope and was delighted to find it near the center of the field of view. A few tweaks of the mounts declination and azimuth controls put Polaris within the markings on the polar scope's reticle.
Here is the finished pier in the yard. Next step, the observatory.


No comments:
Post a Comment